Deep Learning for Image Classification with Keras: Step by Step Tutorial
Introduction
This is a step by step tutorial for building your first deep learning image classification application using Keras framework. This tutorial aims to introduce you the quickest way to build your first deep learning application. For this reason, we will not cover all the details you need to know to understand deep learning completely. However, we will provide you links to available online material to learn all of those details.
Prerequisite Knowledge
In order to fully understand all of the codes in this tutorial, we encourage you to take a look at these online materials:
- Basic Machine Learning
- Basic Deep Learning for Visual Recognition (Convolutional Neural Network)
- Python for Data Science
- Keras Documentation
We will specifically build a Convolutional Neural Network (CNN) in this tutorial. CNN is a deep learning algorithm used for image data.
System and Hardware
This tutorial assumes you work on a computer with Ubuntu 16.04 operating system. If you are a Windows user, please refer to this guide for installing Ubuntu alongside with Windows. For building a deep learning application, we suggest you to use a computer equipped with a CUDA GPU. You are able to run a deep learning application without GPU, but it would be very slow.
Tutorial Outline
Here are the outline of this tutorial:
- Environment Installation
- Import Numpy and Keras Library
- Load and Preprocess MNIST Data
- Design CNN Architecture
- Compile and Train Model
- Print result
Step 1: Environment Installation
In order to run the codes in this tutorial, we need to make sure that these plugins have been installed:
- Python 2.7 or Python 3
- Numpy
- Tensorflow
- Keras
When you install Ubuntu 16.04, Python 2.7 will also be automatically installed. You can check the installation by running this command in your Ubuntu terminal:
$ python
If Python 2.7 has been installed, you will see a view similar to this image:

Type exit() to return.
In case that it is not installed, you can run these commands in your terminal:
$ sudo apt-get update
$ sudo apt-get install python-pip python-dev
To install numpy, run this command in terminal:
$ pip install numpy
Next, we will install Tensorflow, a deep learning framework developed by Google. Tensorflow comes with two version depending on whether you want to use GPU to accelerate Tensorflow or not. If your computer is equipped with GPU, run this command to install Tensorflow with GPU support:
$ pip install tensorflow-gpu
Else, run this command:
$ pip install tensorflow
Finally, we will install Keras, a high-level deep learning framework built on top of Tensorflow. To install it, run this command:
$ pip install keras
Step 2: Import Numpy and Keras Library
Starting from this step, we will start to build the deep learning application using Python. To run the application, you can create a new file named as mnist.py, save it to your home directory, add all the given codes below, and execute the following command in your terminal:
$ python mnist.py
To build our deep learning application, we need to import Numpy and Keras library to our python codes. You can import the necessary libraries by adding the following codes to mnist.py file:
#Step 2: Import Numpy and Keras
import numpy as np

import keras
from keras.models import Model
from keras.layers import Input
from keras.layers import Dense
from keras.layers import Conv2D
from keras.layers import MaxPooling2D
from keras.layers import Flatten
from keras.layers import Dropout
Step 3: Load and Preprocess MNIST Data
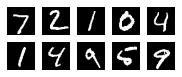
In this tutorial, we will use MNIST dataset. MNIST is a publicly available dataset of handwritten digits image. You can see the details of the dataset here. Below are samples of image in MNIST dataset:
In this tutorial, we will use a pre-loaded MNIST dataset in Keras. To load MNIST, add these following codes to mnist.py file:
#Step 3: Load and Preprocess MNIST data
from keras.datasets import mnist
(X_train, y_train), (X_test, y_test) = mnist.load_data()
The loaded data consists of 4 parts: X_train, y_train, X_test, and y_test. X_train contains image data to be used for training CNN model in the form of matrix. y_train contains labels of the image (0 to 9). X_test and y_test are the image data and labels to be used for testing our CNN model performance.
To use the data in our deep learning application, we need to have some adjustments to the data. We will have 3 adjustments: (1) add 1 more dimension to the image data, (2) normalize the data to value range between -1 to 1, and (3) convert the labels to one-hot vector format. We need to add 1 more dimension the image data because CNN model usually deals with RGB image, which shape defined as (width x height x channel) in its matrix format. The shape of pre-loaded MNIST dataset in Keras is only defined as (width x height), so we need to add 1 more dimension as channel. The following codes will reshape the image data to (width x height x channel):
X_train = X_train.reshape(X_train.shape[0], 28, 28, 1)
X_test = X_test.reshape(X_test.shape[0], 28, 28, 1)
We also need to normalize the data to value between -1 to 1, as deep learning model usually easier to learn from this input value range. You can normalze the data by adding these following codes:
X_train = (X_train/255) - 0.5
X_test = (X_test/255) - 0.5
Finally, you need to convert the format of labels to one-hot vector format. One-hot vector is a vector which value consists only 0 and 1. To convert the labels, add these following codes to mnist.py file:
num_classes = 10
y_train = keras.utils.to_categorical(y_train, num_classes)
y_test = keras.utils.to_categorical(y_test, num_classes)
Step 4: Design CNN Architecture
Now, we can start to design our CNN architecture that learns from the loaded MNIST data. The CNN architecture we use in this tutorial is similar to the visualization below:
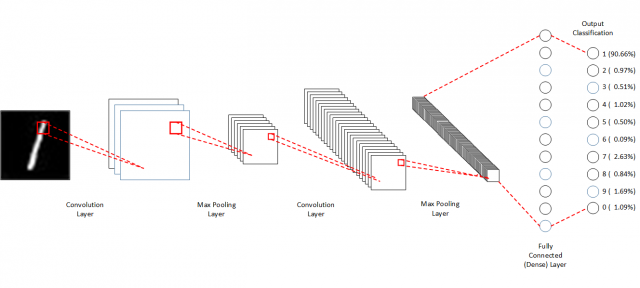
This architecture is inspired from LeNet [1], the original CNN model published in 1989. We use 2 set of Convolutional – Max Pooling layers in the model. Each of the Convolutional layer uses 3×3 kernel and 1 stride. The Max Pooling layers each uses 2×2 pool size. On top of these two layer set, we will add a fully connected (dense) layer with 128 neurons. The output layer consists of 10 neurons, which each neuron output a probability of the data belongs to class 0 to 9. You can learn more about the detailed operations of each layer in here. To use this design into our application, you can add the following codes in our mnist.py file:
#Step 4: Design CNN Architecture
inp = Input(shape=(28,28,1))
i = Conv2D(32, kernel_size=(3,3), activation='relu', name='conv1')(inp)
i = MaxPooling2D(pool_size=(2,2))(i)
i = Conv2D(32, kernel_size=(3,3), activation='relu', name='conv2')(i)
i = MaxPooling2D(pool_size=(2,2))(i)
i = Flatten()(i)
i = Dense(128, activation='relu', name='dense_1')(i)
predictions = Dense(num_classes, activation='softmax', name='dense_last')(i)

model = Model(inputs=inp, outputs=predictions)
Step 5: Compile and Train CNN Model
After adding the CNN architecture, we can now compile it to form a CNN model and train the model to do image classification. To compile the architecture, add the following code:
#Step 5: Compile and Train The Model
model.compile(optimizer='adam', loss='categorical_crossentropy', metrics=['accuracy'])
In this tutorial, we use Adam optimizer [2] and categorical cross-entropy loss. Keras has different optimizer and loss options that can be chosen. You can learn more about Keras optimizers and losses here and here.
Finally, we can train our CNN model to do image classification. Add this code to train it:
history = model.fit(X_train, y_train, epochs=10, batch_size=32)
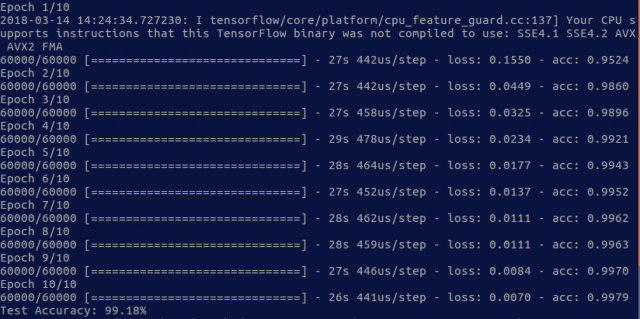
In this tutorial, we set the maximum epochs of our CNN model to 10 and batch size to 32. You can learn more about epoch and batch size here and here. When you run mnist.py later, you will see a view similar to the below image when the above code is executed. The acc number in the image means that your CNN model able to classify images in the training set with 99.21% accuracy.

Step 6: Print Result
After we have trained the CNN model, we can test its performance using a test dataset. Add the following code to print the accuracy of the model in test dataset:
#Step 6: Print Result
scores = model.evaluate(X_test, y_test, verbose=0)
print("Test Accuracy: %.2f%%" % (scores[1]*100))
Run The Application
If you follow step 2 to step 6, your mnist.py file should look like this:
#Step 2: Import Numpy and Keras
import numpy as np

import keras
from keras.models import Model
from keras.layers import Input
from keras.layers import Dense
from keras.layers import Conv2D
from keras.layers import MaxPooling2D
from keras.layers import Flatten
from keras.layers import Dropout

#Step 3: Load and Preprocess MNIST data
from keras.datasets import mnist
(X_train, y_train), (X_test, y_test) = mnist.load_data()

X_train = X_train.reshape(X_train.shape[0], 28, 28, 1)
X_test = X_test.reshape(X_test.shape[0], 28, 28, 1)

X_train = (X_train/255) - 0.5
X_test = (X_test/255) - 0.5

num_classes = 10
y_train = keras.utils.to_categorical(y_train, num_classes)
y_test = keras.utils.to_categorical(y_test, num_classes)

#Step 4: Design CNN Architecture
inp = Input(shape=(28,28,1))
i = Conv2D(32, kernel_size=(3,3), activation='relu', name='conv1')(inp)
i = MaxPooling2D(pool_size=(2,2))(i)
i = Conv2D(32, kernel_size=(3,3), activation='relu', name='conv2')(i)
i = MaxPooling2D(pool_size=(2,2))(i)
i = Flatten()(i)
i = Dense(128, activation='relu', name='dense_1')(i)
predictions = Dense(num_classes, activation='softmax', name='dense_last')(i)

model = Model(inputs=inp, outputs=predictions)

#Step 5: Compile and Train The Model
model.compile(optimizer='adam', loss='categorical_crossentropy', metrics=['accuracy'])
history = model.fit(X_train, y_train, epochs=10, batch_size=32)

#Step 6: Print Result
scores = model.evaluate(X_test, y_test, verbose=0)
print("Test Accuracy: %.2f%%" % (scores[1]*100))
To run your mnist.py file, execute this command in your terminal:
$ python mnist.py
You should see a similar view to the following image after you run your application:
Congratulations, you have already built your first application of Deep Learning for Image Classification! To continue your study, we recommend you to learn the theory behind deep learning more. These online videos from Stanford University courses should be a good start for you.
References
[1] Y. LeCun et al., “Backpropagation Applied to Handwritten Zip Code Recognition,” Neural Computation, vol. 1, no. 4. pp. 541–551, 1989.
[2] D. P. Kingma and J. Ba, “Adam: A Method for Stochastic Optimization,” Int. Conf. Learn. Represent. 2015, pp. 1–15, Dec. 2014.